Chicken and Kale Pot Pie

I thought about just jumping into this post without acknowledging that I haven’t blogged anything in five months, but now I’ve gone and mentioned it, so some sort of explanation is in order. First off, I blame this guy:

 Eeep! He’s got salt on his face, because he eats salt :/


Kidding! It’s really because I’ve been doing a ton of educational data contract work at night, and I’ve been too tired to do anything else.  Tell me more about this fascinating-sounding educational data, you say? No. You don’t say that because nobody ever says that. Anyway, I’ve just finished two of the three big projects I’ve been working on, and I can do fun things again! Last night Andy and I went crazy and watched 4 dozen (not really) shows on hulu while I ate leftover ganache with a spoon. This is living.

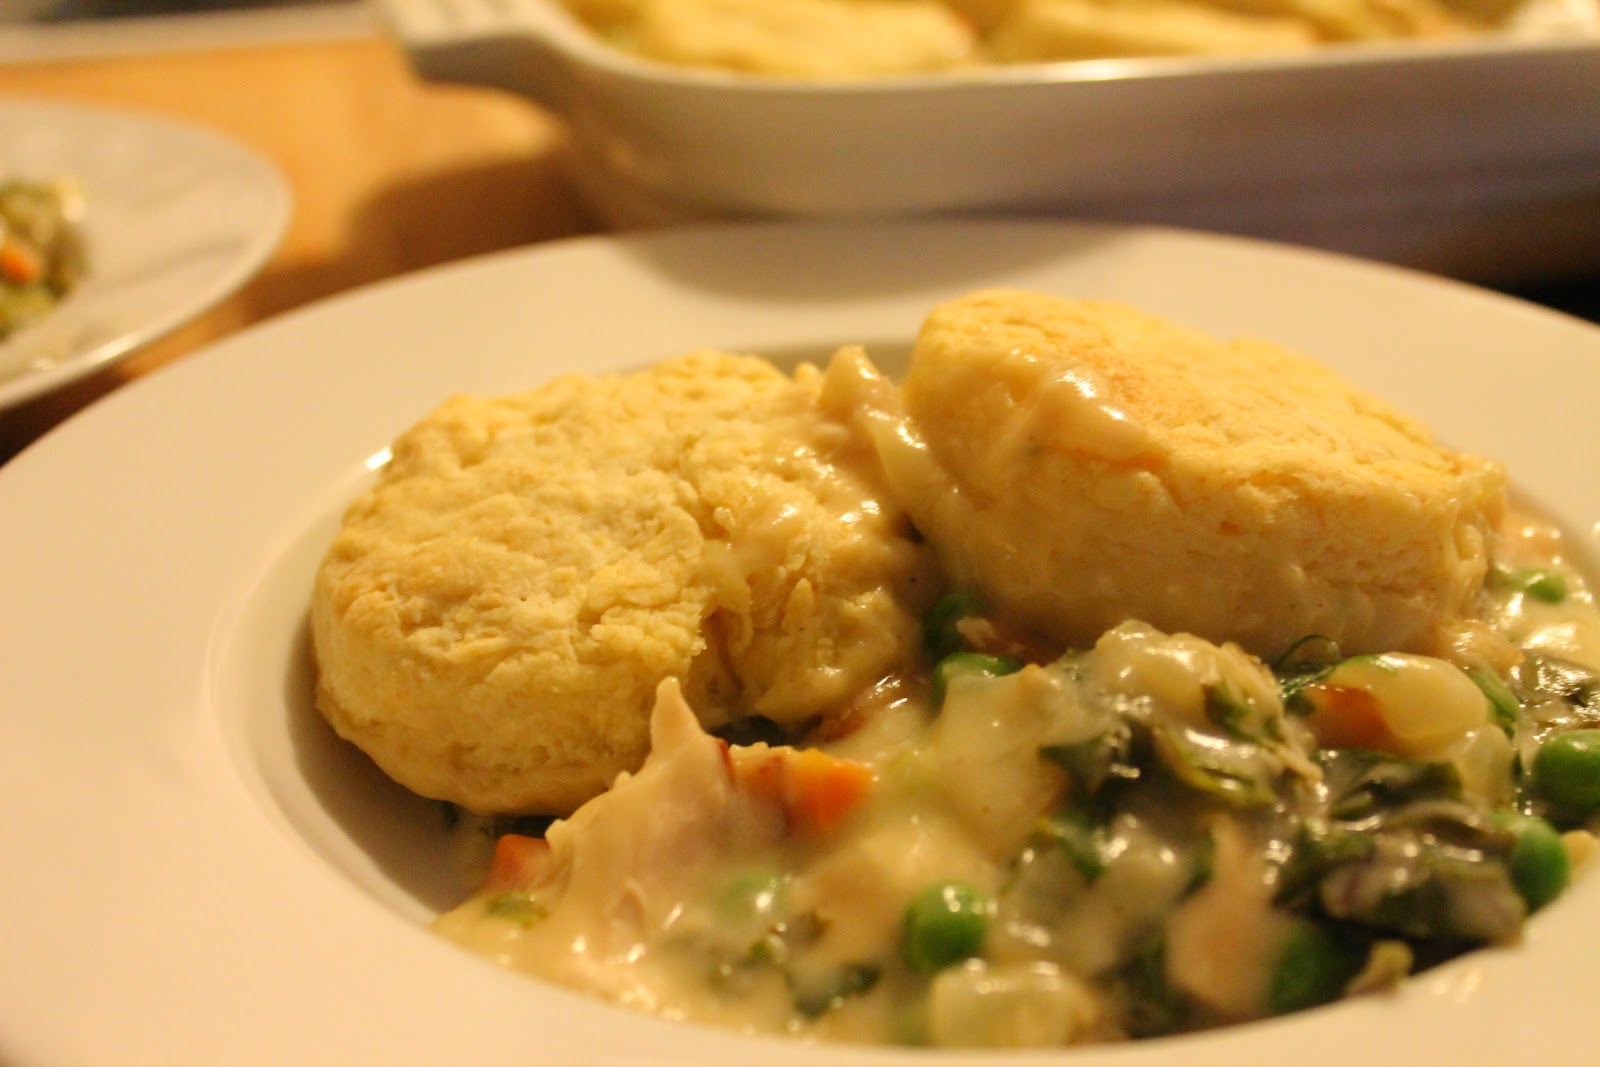
Anyway, despite the lack of blogging, I have been cooking as much or more than I ever did before.  This means three homemade, largely unprocessed meals nearly every day, and I’m eager to share my favorites with you again. I’ve been trying a ton of new recipes, and I’ve been trying to cook healthier stuff too- much less white sugar and flour (don’t look at the top of this post). But for my triumphal return to blogging, I want to share with you one of my very favorite, pre-health-focused, dinners: chicken pot pie with biscuits.

This recipe is a Frankenstein-ian mash up of Cook’s Illustrated’s pot pie (which is fast, but uses boiled chicken breasts and canned stock, blargh) and Ina Garten’s chicken stew with biscuits (which uses too much of everything and requires you to blanch the vegetables individually). I’ve taken what I feel are the best elements of both, with an eye toward simplicity, and the result is a pot pie that has become a family favorite. It’s infinitely adaptable: substitute any vegetables you like, lose the chicken, cover the top with pie dough instead of biscuits, drink the filling from a balloon snifter style cognac glass, what have you.

Chicken and Kale Pot Pie with Biscuits

For the Biscuits (from the Barefoot Contessa, Family Style)

  • 2 cups flour
  • 1 tablespoon baking powder
  • 1 teaspoon kosher salt
  • 1 teaspoon sugar
  • 1 stick cold unsalted butter, diced
  • 3/4 cup half-and-half
  • 1 egg mixed with 1 tablespoon water, for egg wash
For the Filling (adapted from The New Best Recipe)
  • 2 tablespoons canola oil
  • 1 medium-large onion, diced
  • 3 medium carrots, peeled and diced
  • 2 small celery ribs, diced
  • kosher salt and freshly ground pepper
  • 4 tablespoons unsalted butter
  • 1/2 cup flour
  • 2 cups chicken broth, homemade if possible
  • 1.5 cups whole milk
  • 2 cups leftover roasted chicken, shredded
  • 1/2 bunch curly-leafed kale, cleaned and chopped into bite-size pieces
  • 3/4 cup frozen peas
  • 3 tablespoons minced fresh parsley, if you’ve got it
Instructions
  1. Preheat the oven to 375 degrees.
  2. Make the biscuit dough: Combine the flour, baking powder, salt, and sugar in a medium bowl.  Add the butter and cut in with a pastry knife until the butter is the size of peas.  Add the half-and-half and combine with a fork. Dump the dough out on a well-floured board and knead once or twice to bring it together. Use your fingers to pat the dough into a rectangle that’s about 1/2 an inch thick.  Cut out 9 biscuits with a glass or 2 1/2 inch round biscuit cutter. Transfer to a plate and refrigerate until the filling is ready.
  3. Heat the canola oil in a large, heavy-bottomed pot over medium heat. Add the onions, carrots, and celery and saute until just tender, about 5 minutes. Season with salt and pepper and transfer to a bowl (or the casserole dish you’ll be baking the pot pie in, if you’re like me and want to dirty as few dishes as possible). 
  4. Melt the butter in the now empty pan. When the foaming subsides, add the flour and cook for 1 minute, stirring constantly. Whisk in the chicken broth, and then the milk (the gravy may have pockets of flour lumps- keep whisking and the big ones will break up, and the small ones will disappear when the pot pie is baked. you can avoid lumps altogether by heating your stock and milk, but i don’t cuz of the same dirty dish aversion i mentioned earlier). Bring to a simmer and continue to simmer until the sauce fully thickens, 3-5 minutes. Season with salt and pepper to taste.
  5. Add the sauteed vegetables back to the pot of gravy along with the shredded chicken, chopped kale, frozen peas, and the parsley, stirring to combine. Taste for salt and pepper again and add more if necessary. Pour the filling into a 9×13 inch baking dish. Top with the biscuits and brush the dough with the egg wash, if you’re feeling fancy. Bake until the biscuits are golden brown and the filling is bubbly, about 25 minutes. 

My Garden, Summer 2012

Thanks to my sister Helen for taking all of the pictures for this post! Check out her blog here!

For my very first vegetable garden, Andy and I gathered a bunch of sticks from around the yard and used them to make a crudely-hewn 12 inch high “fence.” In my head, the stick-fence was going to be completely adorable, with a Boxcar Children-esque whimsiness, In reality, it was a minor irritation for our two dogs as they tore mad-dash through the garden in their quest for squirrel meat.  Needless to say, it didn’t last long.  We, by which I mean Andy, built this real fence a few years ago, and it has protected my little plants stoically ever since.

This season has been my most productive ever, so I wanted to document some of the things I actually managed to harvest and eat! The act of pulling edible food out of the garden still feels novel and thrilling to me- I’m not a great gardener and it’s taken me a while to figure out the process.

First up: cucumbers! I have one cucumber plant that has gone absolutely crazy.  I attribute the success completely to a few fortunately-timed rain storms.  I’ve used the cucumbers for panzanella, a cucumber salad with smashed garlic and ginger, and pickles, which we’ll get to try on Memorial Day. For the pickles, I opted to go the easy route with refrigerator pickles, and used the brine from this recipe and tips from this post.

This is my rhubarb plant, and I love it so much.  It’s hard to tell from the picture, but the leaves are the size of three human heads- they are so fun. And also toxic. Don’t eat them! It is continuously putting out new stalks, and you just peel off the outer ones as you’re ready to use them.  I made a lovely old fashioned rhubarb cake with my first harvest, and tomorrow I’m going to make a crisp with some more, probably using an adaptation of this recipe. Also, I was alarmed at first that the stalks weren’t turning pink.  Some very lazy googling (in which you read only the text provided on the search page without actually opening any links) taught me that this is just a plant from the green-stalked variety of rhubarb. Not quite as pretty, but just as tart and delicious.

This is a very very young butternut squash. I harvested my first full-grown one last week and used it to make the most amazing recipe from Plenty, the current darling of my cookbook shelf.  It’s a dish of roasted butternut squash wedges with sweet spices, lime, and green chile.  You can get the recipe here. If you’ve got a butternut squash and don’t know what to do with it, I think this recipe is one of the most delicious things I’ve eaten this spring.

Ok- about tomatoes- do you guys actually let your tomatoes turn red on the vine? Am I losing a lot of flavor by picking them green and letting them ripen on a window sill? All my prior attempts at sun-ripening have ended with the tomato being stolen by squirrels or pecked apart by birds :/ But aren’t these pretty? I’ve done really badly with tomatoes in the past (leaf-footed stinkbugs, hornworms, drought+heat+lazy watering) so it feels great to actually harvest some. Helen used the red ones to make a delicious tomato and mango salsa.

Here are a few things on my harvesting horizon:

Chard.  I planted this in March and it’s only just starting to look like a full-grown plant.

Eggplant! I have a Japanese variety and a small heirloom variety.  I’ll most likely use the Japanese variety to make my favorite miso-glazed eggplants, and the traditional variety to top some grilled pizzas (this is my favorite dough recipe). 

San Marzano tomatoes.

Purple Cherokee tomatoes.

The newcomers- corn, pumpkin, and rattlesnake beans.  Together these three crops are known as the three sisters because they benefit from being planted together.  The corn serves as a post for the beans to climb, the beans stabilize the corn and add nitrogen to the soil for the pumpkins, and the pumpkins’ big spiny leaves act as a living mulch and protect the corn and beans from ground-level invaders.  Pretty fun stuff!

Food52 Mozzarella Potluck!

Action shot! A few months back, food52 invited its readers to get together to make mozzarella. Then they sweetened the pitch by throwing in a free gift of two enormous bottles of outstanding California Olive Ranch olive oil to the first 30 people to volunteer to host a mozzarella pot luck.  Lucky for us, Austin-area food52er Molly volunteered to host in her gorgeous home.  So today, a group of Central-Texas-area food52ers got together to make mozzarella and eat a lot of food. 
Pre-mozzarella-ing fare: 
I brought one of my current favorites- fried brussels sprouts in a fish sauce vinaigrette from the Momofuku cookbook.  If you think you don’t like brussels sprouts, I encourage you to try this recipe.  It’s outstanding.  And the fish sauce vinaigrette is great on everything- I used some tonight as a sauce for roasted chicken.

I also brought my first-of-the-season panzanella.  The cucumbers are from my garden! The basil is too, but that’s not as exciting as cucumbers. I used the vinaigrette from this recipe, and tossed the tomatoes, cucumbers, red onion, and basil with bread cubes that I crisped in the oven with olive oil and kosher salt. It’s one of our favorites.

Nannydeb’s chocolate cake with coconut filling and ganache!! Double exclamation points for a double-y delicious cake.  To wit: I got to take a big slab home with me, and Andy, Henry, and I each had a piece for dessert.  Henry fastidiously pinched up every last crumb with his little thumb and index finger, and when he’d eaten the last he started clapping.  No lie.

A beautiful olive bread! I think Abbie made this, but I’m not certain.  Wherever it came from, I loved it.

Kimberly brought a gorgeous blueberry pie- it was probably the best I’ve had.  The blueberries were soft but still held their shape in a beautifully thickened, not-too-sweet filling.

Sonja brought this delicious hummus, which is enlivened by roasted chickpeas and horseradish.  I ate quite a bit of it!

Abbie also brought her famous marinated garden.  This stuff is addictive, especially when it’s filled with produce from Abbie’s backyard garden!

Debby brought tamales from La Hacienda in San Antonio.  Amazing! I had the chicken ones and loved them so.

Ginny brought a fantastic arugula salad featuring the genius lemon caper dressing from food52.  Ginny has a totally adorable family and is a fantastic cook.  Check out her blog, Ginny’s Kitchen!

After our potluck, we got down to the business at hand.  Molly bought five gallons of low-heat pasteurized milk from the farmers’ market, and we turned it all into mozzarella! One gallon of milk will make about a pound of cheese.  You can learn how to do it here.  The process is really fairly simple, and it’s completely magical to turn milk into cheese in the span of about 15 minutes. We warmed the milk, added citric acid to curdle, warmed it some more, added rennet to coagulate, warmed to 105 degrees, and then let it sit for 10 minutes undisturbed.  After that, you keep it warm (by microwaving or dunking it back into the hot whey) and knead it for 5 or so minutes until it’s smooth.  Here’s Ginny with an impressive stretch!

We did it! The finished product was really wonderful. Soft and buttery-rich.  We made five batches and some came out better than others, for reasons I’m not too clear on.  The batch on the plate with tomatoes and peaches was my favorite.  It was softer than the others (we may have used a bit less rennet?), and was actually heated using the microwave method, so salt was added directly to the curds instead of to the heated whey.  The direct salting made that batch more flavorful too.

It was a grand time, with some really delicious eats.  Thanks to Molly for hosting!