Prickly Pear "Cheese"Cake (gluten and dairy free)

I really had no idea what to do for an August pie. There’s still lots to be had at the farmers market in August, but not much fruit (that I’ve seen). You can get a butternut squash and I think even early sweet potatoes, but who wants a winter squash pie in August? Then, during a lunch with my friend Abbie and other food-loving friends, one of my very favorite local food bloggers, Elizabeth of Local Savour, recommended prickly pears. And my awesome friend Abbie said that she knew exactly where to find some ripe ones!

Henry loves picking tomatoes from the garden, and harvesting anything really, so he was very excited about our prickly pear picking outting. He turned out to really hate it though. And honestly I didn’t love the process either, though maybe it was because Henry whined so much :/ Abbie brought gloves for all of us (I forgot ours), and it seems like you’d be able to just carefully put your fingers around the prickly pear and avoid the glochids (the clusters of spines on the pears) altogether. But we all failed at that- those spines are insidious! We all ended up with fingers full of them and had to use duct tape and tweezers to try to get them out. But hell, we did it! I recommend trying it for yourself with leather gloves and without a toddler in tow.

Anyway, I decided to use the pears to make a gluten and dairy free cheesecake. Which sounds terrible, I know. Who wants a cheesecake without cream cheese? But I had read a blog about a vegan cheesecake months earlier and I couldn’t get the idea out of my head (go check it out- these are mini no bake chocolate peanut butter cup vegan cheesecakes).  I loved that they didn’t use tofutti or a cream cheese substitute- the filling is made primarily with soaked and blended cashews (which get so smooth and creamy), coconut milk, and coconut oil. So I adapted that recipe from Minimalist Baker a bit to make it gluten free, and prickly pear instead of peanut butter, and big instead of mini. Here’s how it went down:

In the past when I’ve used prickly pears (always just one at a time to make Henry’s favorite hot pink lemonade), I’ve either burned the spines off the prickly pears over flames (like from a gas stove or a grill), or just peeled them carefully. This time Abbie taught me an awesome trick where all you have to do is put the pears in a colander and shake them vigorously under running water. It worked beautifully! But I still wanted to be careful about removing the flesh, so I followed a technique from Rick Bayless where you cut of about a 1/2 inch from the top and bottom, cut the rest in half, and scoop out the flesh with a spoon. 

I ran the flesh through a food mill (it’s super seedy), but you could also just push in through a strainer with a spoon, or mash it up with a potato masher and then strain the juices out.

13 prickly pears gave me almost exactly 1/2 a cup of juice.

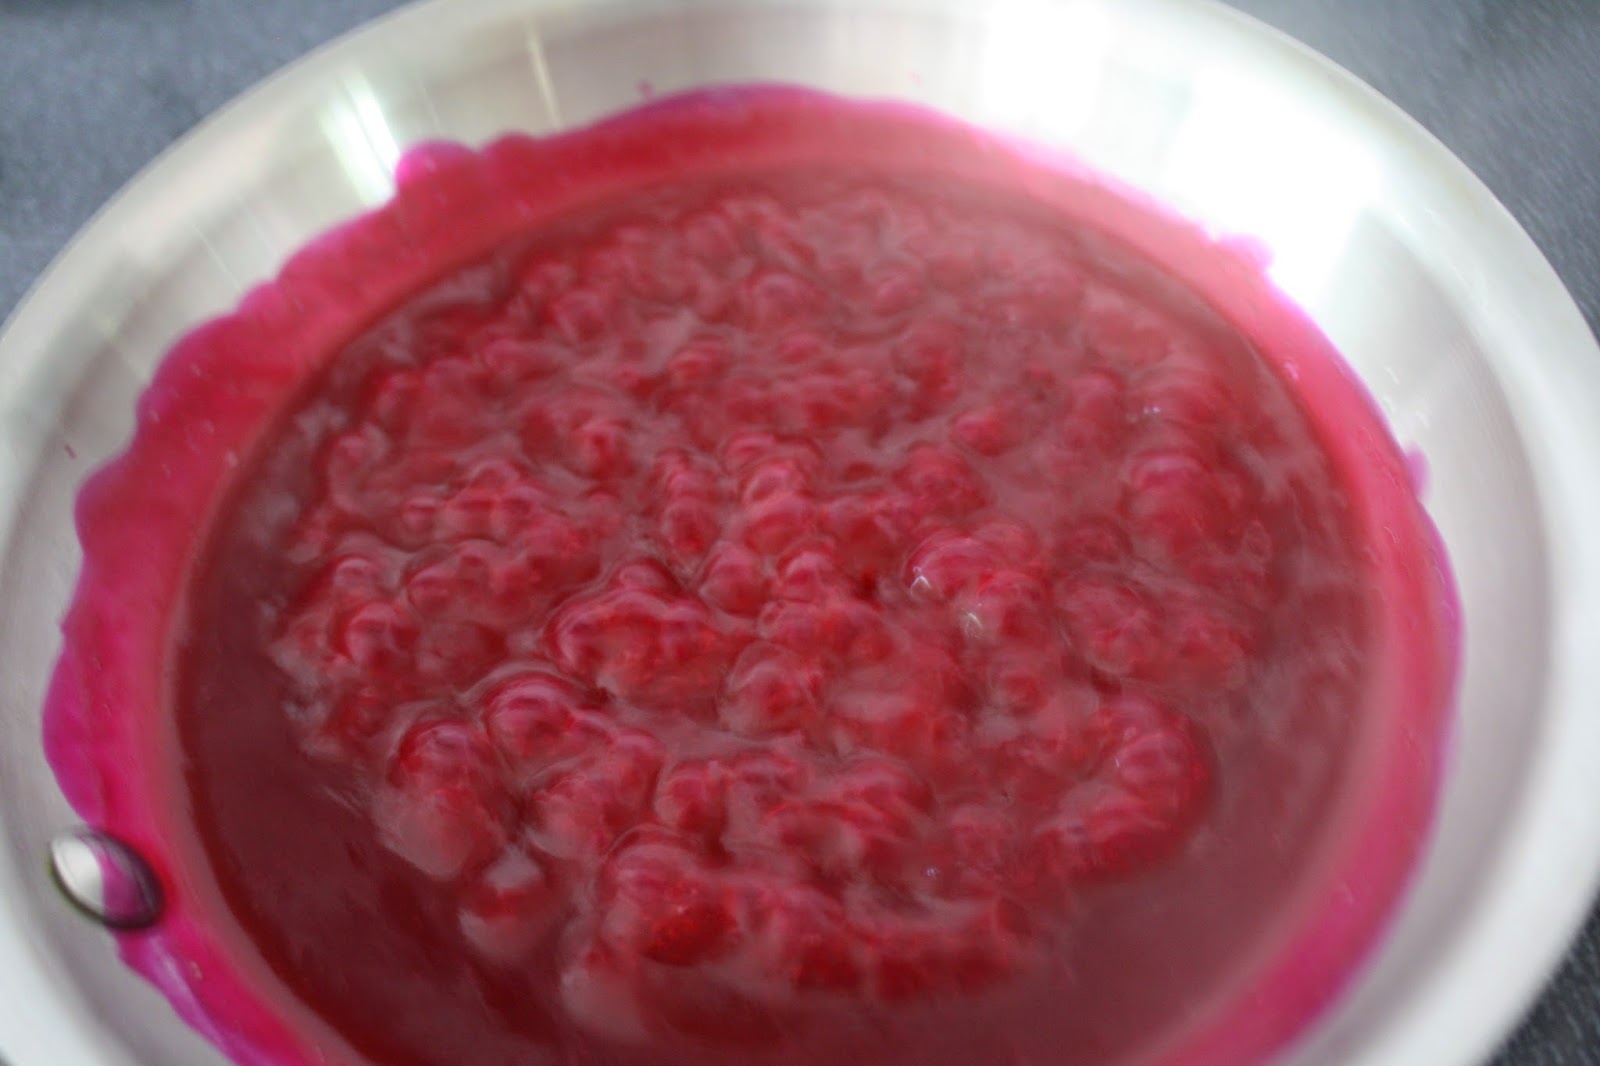
I mixed the cold prickly pear juice with 1/2 a tablespoon of cornstarch and brought it to a boil in a small saucepan, stirring constantly until it thickened up. I didn’t add any sugar because the prickly pears were incredibly sweet.

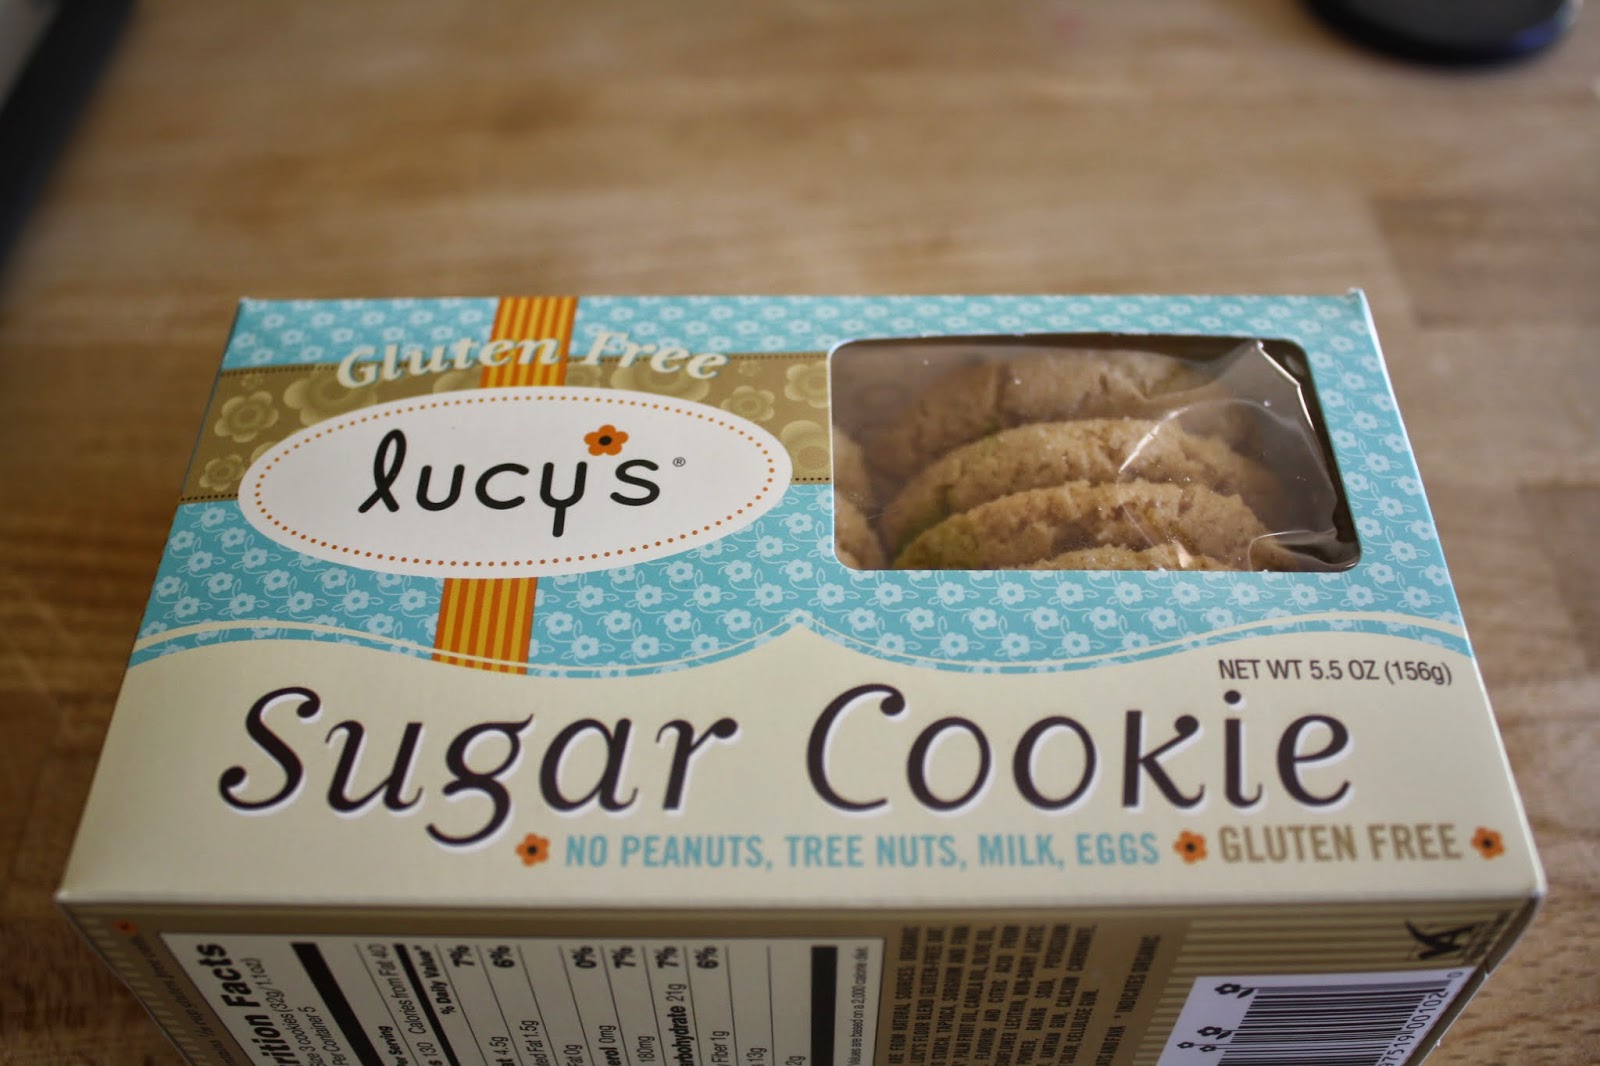
With that done, all I had left to do was make the cookie crust (I used these GF cookies, which I found at Wheatsville- they’re delicious).

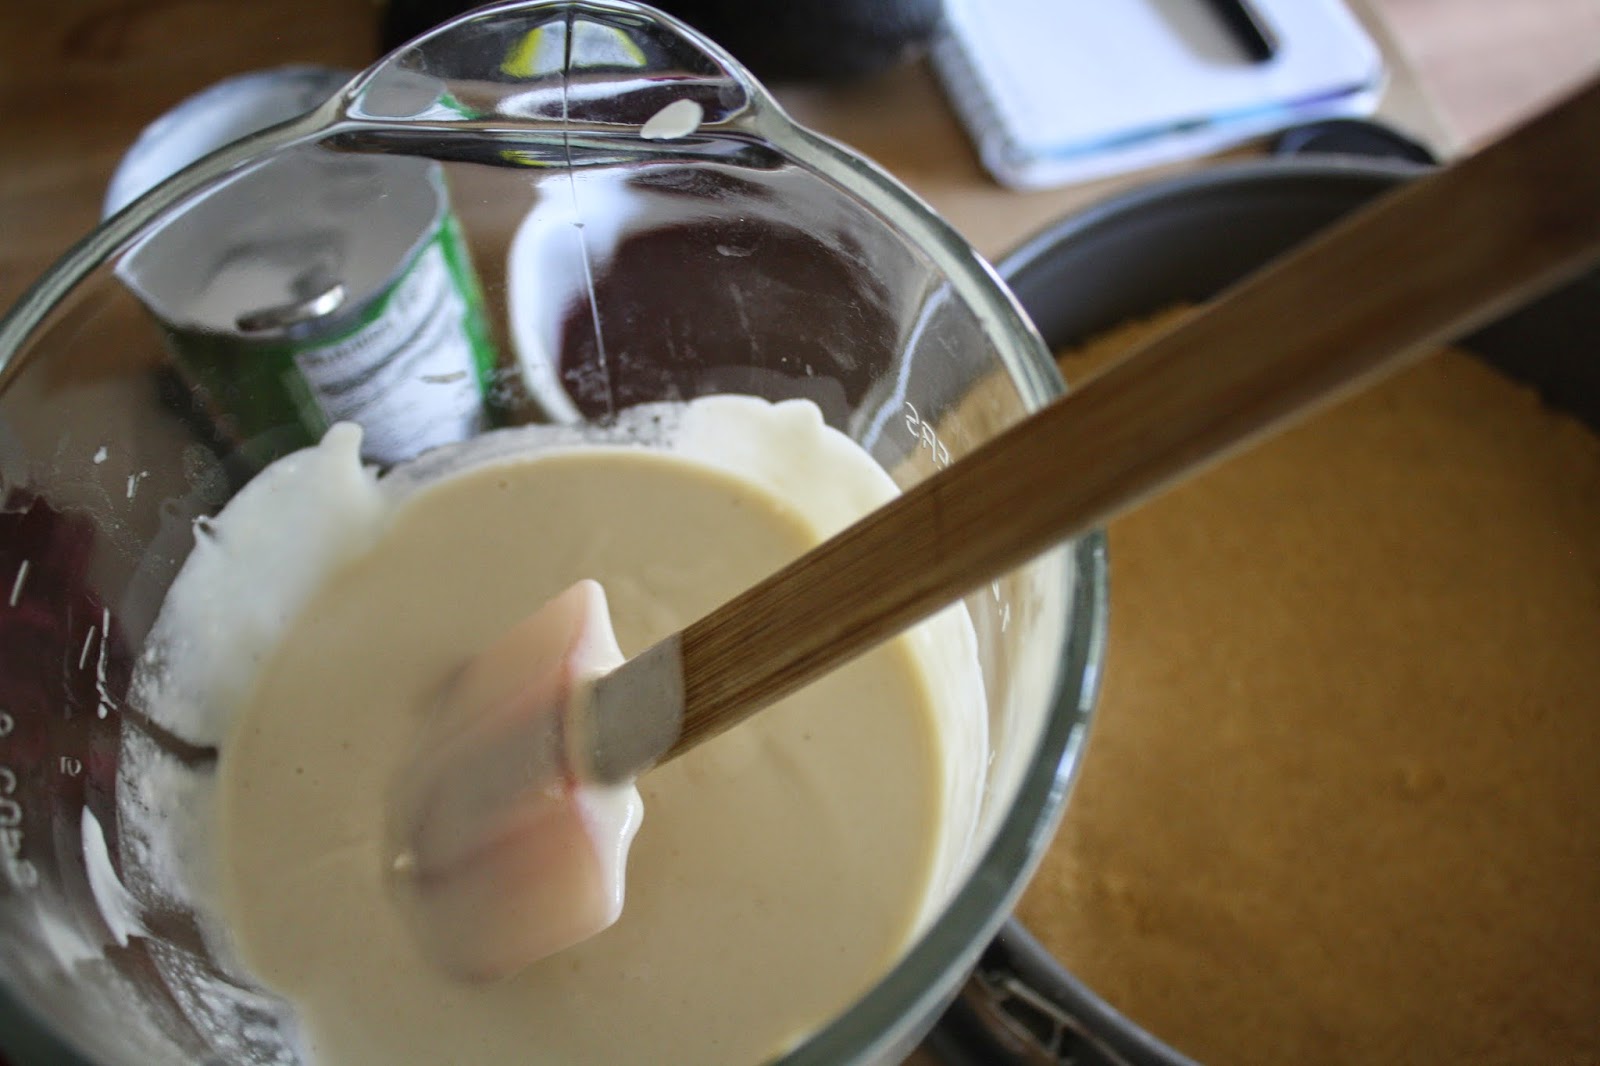
And blend up the super simple cheesecake filling (I had already soaked the cashews for the filling).

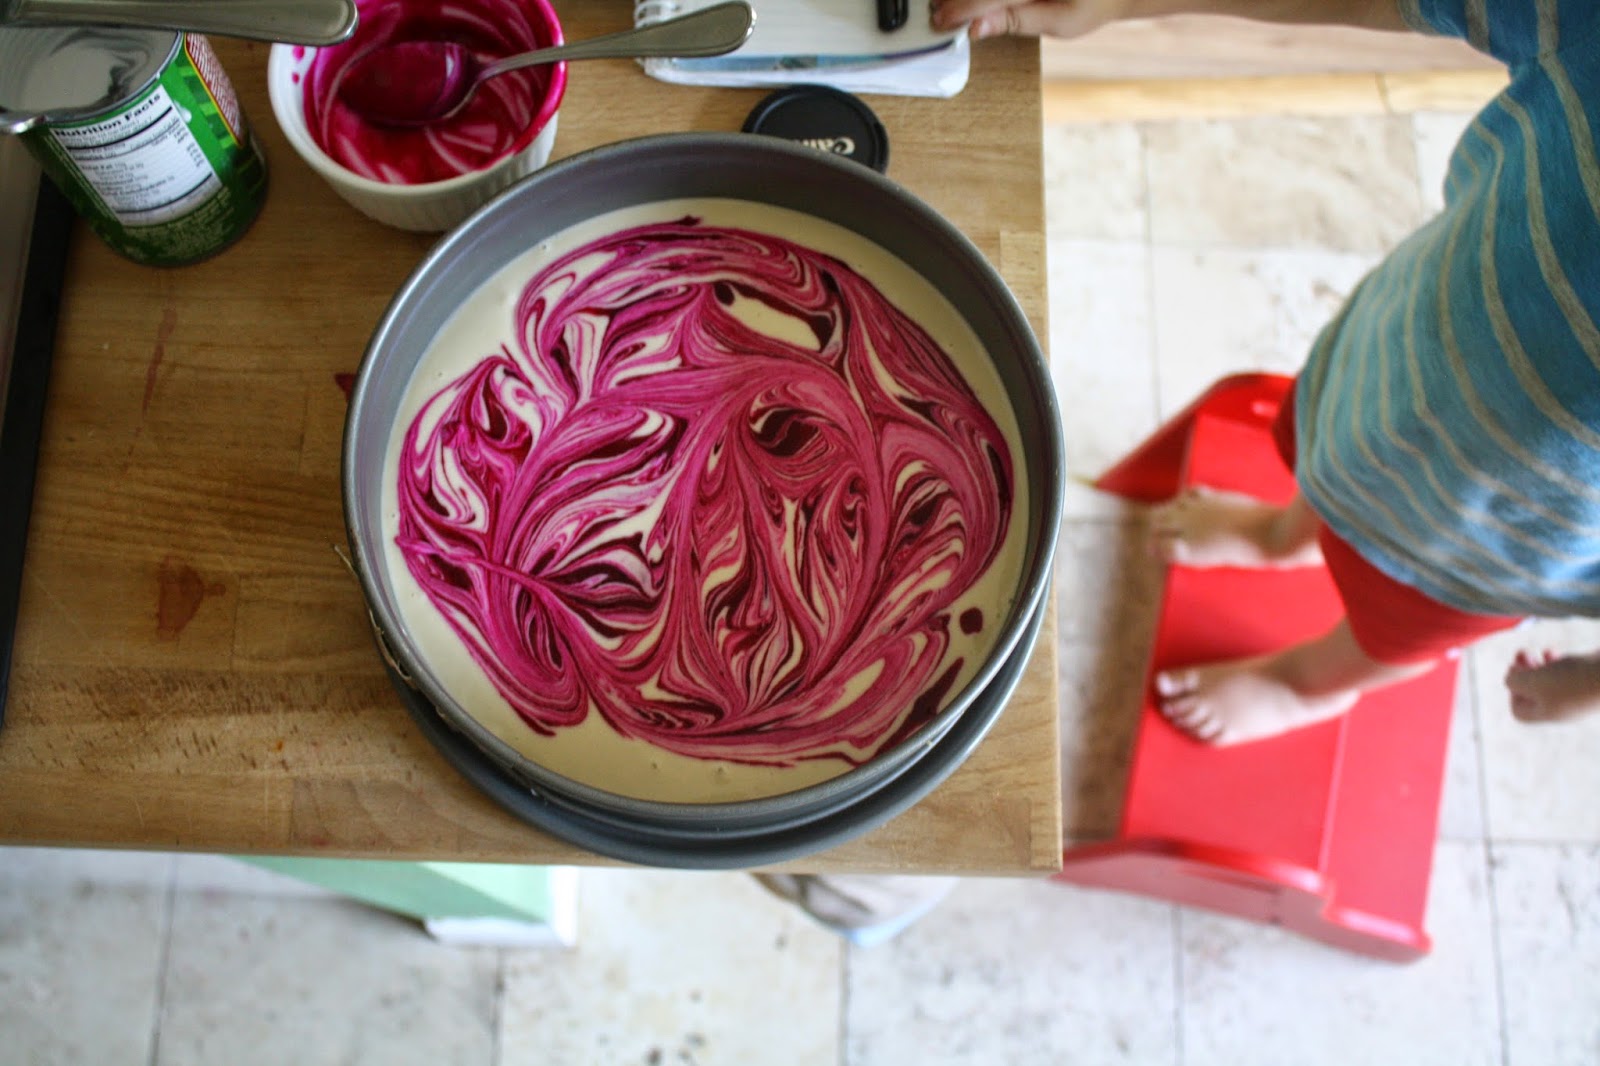
All that remained was swirling my prickly pear puree into the top of the cheesecake and chilling it thoroughly. As it happened, it was in my freezer for 3 weeks before I was able to give it to my sister Joanna, but she said that it was totally delicious, even though she was initially weirded out by the concept of a cheeseless cheesecake. She did note that the original recipe calls for the cheesecake to be served frozen, and that they stored and ate it from the fridge, and that the texture was perfect that way. If you are, for one reason or another, drawn to the idea of a cheeseless cheesecake, give it a spin!

Prickly Pear “Cheese”Cake
adapted from Minimalist Baker

For the Crust:

  • 5-6 oz gluten and dairy free sugar cookies, crushed (about 1 1/4 cup crumbs)
  • 2 tablespoons coconut oil, melted if solid
For the Filling:

  • 1.5 cups raw cashews, soaked in water 4-6 hours then drained
  • 1/4 cup lemon juice
  • 1/3 cup coconut oil, melted if solid
  • 1/2 cup + 2 Tbsp full fat coconut milk (refrigerate the can over night and then scoop out the rich, thick white cream, leaving most of the watery part)
  • 1/2 cup honey, maple syrup, or agave nectar
For the Prickly Pear Swirl:
  • about a dozen ripe dark red prickly pears
  • 1/2 tablespoon cornstarch
Make the Crust:
Preheat the oven to 350 degrees. Mix the cookie crumbs with coconut oil and press into the bottom of a 9-inch springform pan. Bake for 10 minutes, or until lightly golden brown. Set aside to cool completely. 
Make the Filling:
Blend the drained cashews, lemon juice, coconut oil, coconut milk, and honey in a blender. Process until completely smooth, about 3-4 minutes, scraping down the sides as needed and adding a splash of coconut oil or milk if the mixture seems too thick. 
Make the Prickly Pear Puree:
Put your prickly pears in a colander and, under running water, shake vigorously to knock off the spines and rinse them off the pears. When the pears look smooth, cut a 1/2 inch off the top and bottom, cut in half, and scoop out the flesh. Put the flesh in a food mill and push through to separate the juice and pulp from the seeds. Combine 1/2 cup of juice with 1/2 tablespoon cornstarch, transfer to a small pan, and bring to a boil over medium heat, stirring constantly, until thickened. 
Assemble and Chill the Cheesecake:
Pour the filling into cooled cookie crust. Drop spoonfuls of the thickened prickly pear puree onto the top of the cheesecake and swirl into the filling with a butter knife. Transfer the finished cheesecake to the freezer and freeze until firm- at least three hours. At this point you can leave it in the freezer, covered, until you’re ready to eat it, but I would move it to the refrigerator and let it thaw out for a few hours (or more) before you dig in. 

Streusel-Topped Peach Pie (gluten and dairy free)

Welp. I baked this pie in July, and here we are in mid-September and I am only now sharing it with you. It feels a little silly to post a pie-of-the-month two months late, but I’m gonna go ahead and do it. Because this pie was delicious! And maybe I’ll want to look this recipe up again next year.

A lot has happened since I baked this pie. Foremost among them is that my beautiful sister gave birth to the most amazing little girl. Meet Phinnie!

She’s only a month old but has already added so much to our lives- she’s the most peaceful, patient baby I’ve ever met. And so pretty!  She does this amazing thing when you talk to her- she opens her mouth in this big round smile, and it makes you feel like you’re the most hilarious person in the world. We are going to be very good friends indeed.

My baby George turned 1! I simultaneously can’t believe he’s already a year old and feel that life before him seems like ages ago. George is a true scientist. I know all kids are, really, but I didn’t notice it as much with Henry. George observes everything with this wonderful scrutiny. Strangers notice it too, and are forever commenting on how pensive and contemplative he looks. He will put absolutely anything in his mouth, but favors very small rocks. He also bites the tip off of a crayola marker on the daily. Even so, he eats next to nothing (besides milk). I’ve set down a meal for him three times a day, plus snacks, for the past 6 months, and the kid will only reliably eat a slice of monterrey jack cheese (in marked contrast to Henry, who now swears he hates cheese, and will only eat a quesadilla if it’s a sad cheese-less shell of itself). George climbs on everything, chases Henry everywhere, and says a few words. His favorites are Papa, Wow, Mii?? (which he says while tugging at my shirt neck) and Uh-oh, which he says anytime he drops something. He’s an undeniable delight.

My dear Henry has been a lot of fun too. He was really into maps and geopuzzles this winter, and then completely gave them up for about 6 months. Then something happened, no idea what, that reignited that spark and he’s been obsessed with all things geography for the past month or two. Our table is always covered with at least 4 of his geopuzzles. He can get upset when we have to take them apart to serve dinner, so sometimes we’ll just throw a tablecloth over his collection of assembled puzzles, or other nights we’ll convince him to take apart all but two of them, which are pushed to the far edges of the table and bookend our meal. He’s been sleeping absolutely terribly- he stays up till 11 or 12, just working in his room (his words). As I write this at 11 and he’s awake in his room surrounded by a pile of books he’s pulled off the shelf. When we ask what he’s doing he says that he’s learning to read.

Anyway, back to pie! I made this during the height of Texas peach season, and it really was a treat. It’s adapted from The New Best Recipe’s peach pie, my favorite gluten free crust recipe, and a gluten free version of the streusel topping on my favorite apple pie. All together it might have been my favorite GFDF Pie of the Month yet.

I’ve got a pie for August too, and I just made my September pie today. My goal is to rapid fire share them all with you this week, but who knows man!

Streusel-Topped Peach Pie
adapted from The New Best Recipe

For the Crust:

  • 3 cups Gluten-Free all-purpose flour
  • 2 tablespoons granulated sugar
  • 1 teaspoon salt
  • 1 cup (2 sticks) Earth Balance (or butter), cold and cut into cubes
  • 1 large egg
  • 1/2 cup cold well-shaken coconut milk mixed with a teaspoon of lemon juice (or 1/2 cup buttermilk)
For the Filling:
  • 6-7 medium, ripe peaches (about 7 cups sliced)
  • 1 tablespoon lemon juice
  • 1 cup sugar
  • pinch of cinnamon
  • pinch of freshly grated nutmeg
  • pinch salt
  • 3-5 tablespoons potato starch

For the Streusel Topping:

  • 1 cup Gluten-Free all purpose flour
  • 1/2 cup light brown sugar
  • 1/2 cup granulated sugar
  • 1 teaspoon ground cinnamon
  • 1 stick cold unsalted earthbalance (or butter), diced small

To make the Crust:

In a medium bowl, whisk together flour, sugar, and salt. Add cold, cubed Earth Balance (or butter) and, using your fingers or a pastry knife, work the butter into the flour mixture. Quickly break the butter down into the flour mixture, some butter pieces will be the size of oat flakes, some will be the size of peas. In a small bowl, stir together the egg and coconut milk/lemon juice mixture. Create a well in the butter and flour mixture and pour in the liquid mixture. Use a fork to bring the dough together. Try to moisten all of the flour bits. On a lightly floured work surface, dump out the dough mixture. It will be moist and shaggy. Sprinkle generously with flour. Shape dough into two disks and wrap in plastic wrap. Allow dough to rest in the fridge for 1 hour. Dough is easiest to roll out when it’s cold and rested.

On a well-floured work surface, gently roll out the pie crust into about an 11-inch circle. Press together any spots that might tear. Carefully lift down and place into the 9-inch pie plate. Use a pairing knife to trim the edges of pie dough, leaving about 1/2 inch extra dough overhang. Fold the excess dough under and crimp with fingers to make a finished edge. Refrigerate while you make the filling.

To make the Filling:
Preheat the oven to 425 degrees. Bring a large pot of water to a boil over high heat. Fill a large bowl with ice water and set it on the counter near the boiling pot of water. Wash the peaches and cut a small X in the bottom of each, just through the skin if you can, not into the flesh. Drop half the peaches gently into the boiling water and let boil for a minute or two, until you see the skin around the X starting to flap around in the water. Use a metal spider or large slotted spoon to transfer the boiled peaches to the bowl of ice water to stop the cooking. Repeat the blanching process with the other half of your peaches. Peel the skin from the peaches, halve them, remove the pit, and cut each half into 4 slices.
Toss the peach slices, lemon juice, sugar, cinnamon, nutmeg, salt, and potato starch in a medium bowl.  Dump into the dough-lined pie plate and let sit while you make the streusel topping. 
To make the Streusel Topping:

Mix together the flour, sugars, and cinnamon in a medium-sized bowl. Use a pastry knife to cut in the butter until the mixture forms coarse crumbs.

Assemble and Bake the Pie:

Sprinkle the streusel evenly over the pie, covering every bit of the peach filling if possible. Put the pie on a foil-lined baking sheet (to catch any drips) and put in the 425 degree oven. Bake for 25-30, or until the crust is set and begins to brown. Reduce the oven temperature to 375 degrees and continue baking until the filling is bubbling, about 30 minutes longer.  Keep an eye on this pie though, and if the streusel topping starts to burn, loosely drape a sheet of aluminum foil over the top. Keep cooking until the juices bubble through in places. Cool the pie on a wire rack for at least 2 hours before serving.


Blackberry Crostata with Cornmeal Crust (Gluten and Dairy Free)

Have you made a crostata before? It’s the Italian version of the French galette. Crostatas and galettes are actually the exact same thing: a free-form fruit pie cooked on a baking sheet instead of in a pie or tart pan. I called this one a crostata though, because in my head galettes are fancy, where you layer the fruit in concentric circles and use apricot glazes and all that fussy-business, and crostatas are rustic (read: uglier) and easier. Anyway, crostatas are awesome.  All the benefits of a pie, without all the fussiness of crimping and topping. Plus they cook faster (this one is done in 35 minutes!) and the outside is crisper too! The short cooking time is great for summer berries, which don’t need to be cooked all that much anyway, so I wanted to try it out for this months blackberry pie. This crust was inspired by the amazing tart crust from Melissa Clark’s gorgeous tomato crostata combined with my favorite gluten free crust dough from Joy the Baker. They worked beautifully together and the dough was supple and easy to roll out (it pays to add an egg to gluten free pie doughs!). The cornmeal isn’t really discernible but does give the crust a bit of a pleasant crackly-ness. The blackberries though! I used 4 cups of blackberries from the farmers market, and they were super tart.  I sprinkled a quarter cup of sugar on top of them and thought, man, that looks like a lot of sugar! I didn’t want the filling to be overly sweet, so I stopped there.  It was a mistake! The berries were still crazy crazy sour. Next time I’ll add a full half cup of sugar (that’s what I’m writing in the recipe below) and then taste and add even more if needed. Sour or no, it was still warm and rich and fruity, and that’s good enough for me!

Blackberry Crostata with Cornmeal Crust

  • 1 cup (125 grams) gluten free all purpose flour blend
  • 1/2 cup (75 grams) fine cornmeal
  • 1 tablespoon sugar
  • 1/4 teaspoon fine sea salt
  • 10 tablespoons earth balance or butter, chilled and cubed
  • 1/4 cup full-fat coconut milk, shaken and chilled
  • squeeze of lemon (about 1/2 teaspoon)
  • 1 egg
  • 4 cups fresh blackberries
  • 1/2 cup sugar (or more as needed)
  • 3 tablespoons cornstarch
  • zest of one lemon
  • 1 tablespoon lemon juice
  • pinch of salt
  • egg wash (one beaten egg mixed with one tablespoon water)
  • turbinado sugar, for sprinkling on top
1. For the crust: Combine the flour, cornmeal, sugar, and salt in a medium bowl.  Using a pastry knife, cut the butter into the flour mixture until only a few pea-sized pieces of butter remain. Combine the coconut milk and a squeeze of lemon juice, then beat in 1 whole egg and stir until well combined. Fold  the coconut milk mixture into the flour and butter mixture with a rubber spatula. Use your hands to bring the dough together into a ball using a few folding squeezes, and then flatten it into a disk, wrap in plastic wrap, and chill for at least an hour, or up to overnight. 
2. Preheat the oven to 425 degrees. Line a baking sheet with parchment paper. Roll out the chilled dough on a well-floured counter until it is approximately 12 inches in diameter, then carefully transfer to your lined baking sheet. Put the sheet pan in the refrigerator while you prepare the filling.
3. For the filling: Put the blackberries in a medium bowl and gently toss with the 1/2 cup of sugar. Taste your sugared berries and decide if they need more sugar, then add the cornstarch, lemon zest, lemon juice, and a pinch of salt and mix gently.
4. Assemble the crostata: Take the baking sheet out of the fridge and tumble the berries and their juices into the center of the dough circle, leaving a 3 inch or so margin around the edge of the dough. Fold the dough up around the filling, pleating it here and there, and pinching closed any cracks that form. Brush the crust with egg wash and sprinkle the whole top (crust and filling) liberally with turbinado sugar. Put the sheet pan in the preheated oven and bake for 35-40 minutes, or until the crust is deep golden brown and the filling is bubbly. Enjoy warm or at room temperature, with a scoop of something resembling vanilla ice cream!