Grapefruit Pie (Gluten and Dairy Free)

I’m sneaking the second post in my series of a gluten/dairy free pie of the month in just under the wire- February was here and gone in a flash for me. When I was planning out my GFDFPOTM posts, February was a no-brainer. It had to be a take on Christina Tosi’s famous Grapefruit Pie. Two of my favorite food52 bloggers have raved about this pie, and we’ve got tons of beautiful and local grapefruit in February, so I was determined to try to make a gluten and dairy free version. But man alive, those ingredients were against me from the start! A crust made of ritz crackers, butter, and milk powder, a buttery passion fruit curd filling, and a topping made from condensed milk- so much dairy!

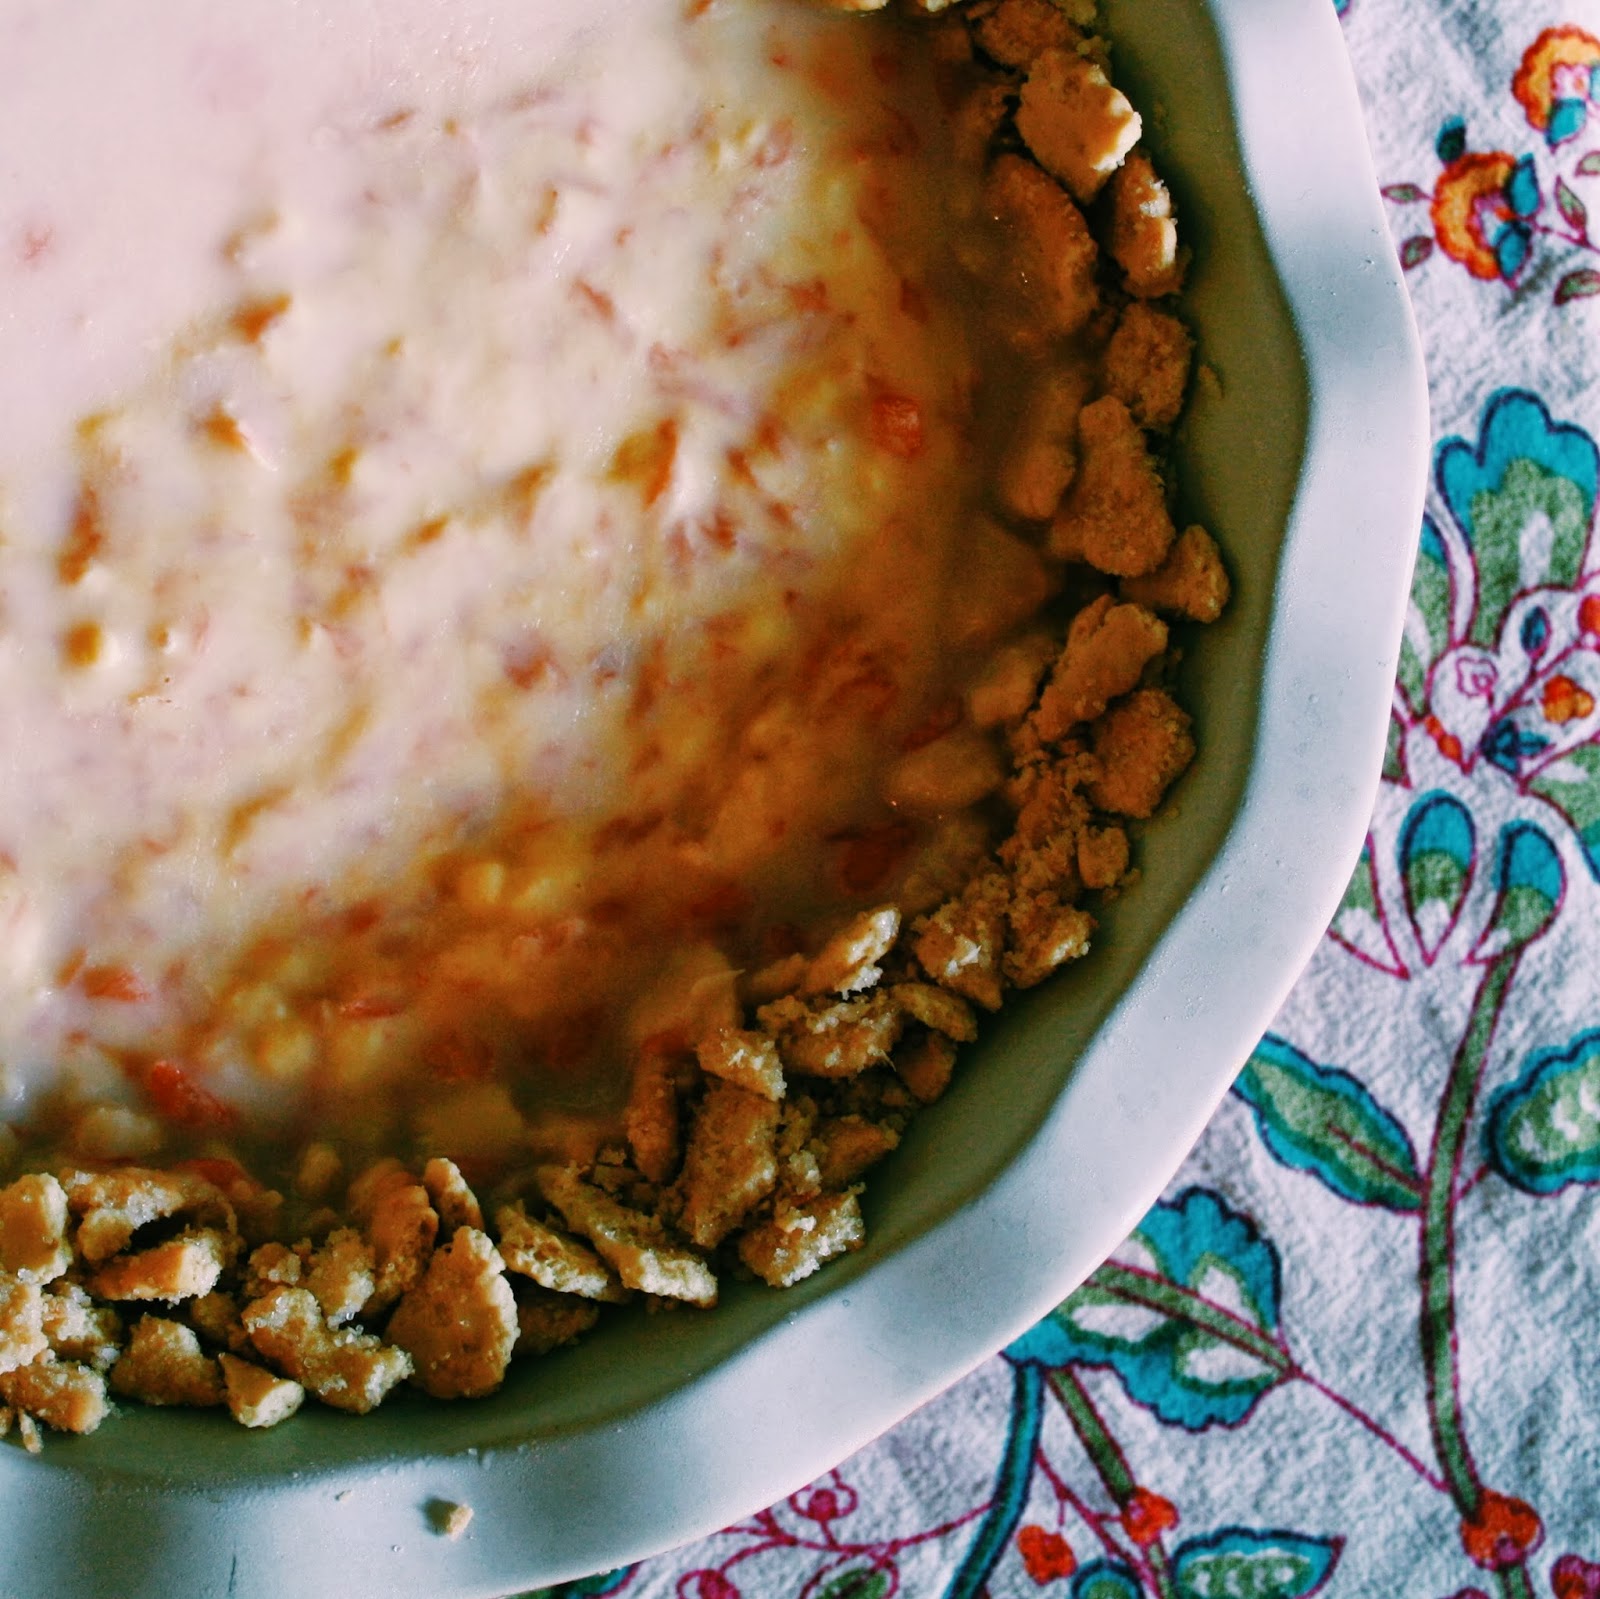
So I’m going to tell you the changes that I made, but before that I’m going to tell you that they weren’t all successful. (A copy of the original recipe is here). The grapefruit-y  part of this pie, a beautiful passion fruit curd with hundreds of grapefruit threads suspended in it, was outstanding, and quite simple to make GF/DF- I just had to sub coconut oil for butter in the curd. (Heads up for any central Texas folks attempting this pie- you can find passion fruit puree in the freezer section of Fiesta, but not by the ice cream- it was on the other side of the store closer to the Jewish foods. Central Market didn’t have it). For the crust, I picked out the most ritz-looking gluten free crackers I could find (a plain Glutino variety), subbed coconut oil for the butter, and shredded unsweetened coconut for the milk powder. The crackers tasted pretty terrible on their own, but mixed with fat and sugar they were (unsurprisingly) improved! I baked the crust as directed in the original recipe, and it didn’t really brown, but did turn into a crunchy crust, so huzzah! The topping in the original pie is a sweetened condensed milk mixed with citric acid to thicken it (citric acid is surprisingly easy to find- I’ve seen it in bulk at Wheatsville and I bought a small bag at the Savory Spice Shop). In lieu of condensed milk I emptied a can of coconut milk into a small pan, added 1/4 cup of sugar, and cooked it on low until it had reduced to 3/4 of a cup. While it looked thicker, it was no where near as thick as regular sweetened condensed milk and the citric acid did nothing to thicken it, and instead only made an under-sweetened condensed milk unacceptably sour. This layer is supposed to have red food coloring added too, which I omitted because I don’t like food dyes. The original recipe says that this pie is supposed to be frozen. I’ve got one of those side-by-side refrigerator/freezers and the damn thing is not wide enough to accommodate my pie plate! So I tilted the pie and stuck it in slant-ways. Naturally, since the topping was under-thickened anyway it all pooled on one side and froze that way, which explains why my picture of the pie at the top of this post is cropped so oddly and why you don’t see a lovely smooth pink layer on top. Whew!

As for the taste: The grapefruit/passion fruit layer is outstanding- Henry and Andy and I enjoyed swiping tastes from the emptied blender jar, and the technique for separating all those little grapefruit segments into their individual threads is so fun (you just heat them gently in a teaspoon of oil!)- I’m thinking of other things I can fold little citrus bits into. But the crust and the topping were really not worth replicating. I’m sure the crust made with real ritz crackers is sublime, but I just don’t think it was worth the added work and expense with GF crackers. And the topping just didn’t work at all when made dairy free. So for this recipe I have decided to write it up how I will cook this pie next time, with my favorite coconut crust (it’s paleo!) and with a whipped coconut cream on top instead of the condensed milk/citric acid layer. Finally, I really preferred this pie just chilled, not frozen. The curd was so smooth and dreamy when it was cold, and I thought it was just a bit too hard and icy when frozen, so I won’t serve it that way again.With these changes, this is a pie I’d be happy to make again and again.

Grapefruit Pie
adapted from the Momofuku Milk Bar cookbook
(this recipe is different than the pie pictured at the top of this post- read the notes above to find out why)

For the Crust

  • 1/2 cup coconut flour
  • 1/2 cup almond meal
  • 1/4 cup shredded unsweetened coconut
  • 1/2 cup coconut sugar
  • 1 teaspoon kosher salt
  • 1/2 cup extra virgin coconut oil, melted

For the Filling
  • 1/4 cup passion fruit puree
  • 3 tablespoons sugar
  • 1 large egg
  • 1/2 gelatin sheet or 1/4 teaspoon powdered gelatin
  • 6 tablespoons coconut oil, melted
  • 1/4 teaspoon kosher salt
  • 1 large grapefruit
  • 1 teaspoon coconut oil 


For the Topping

  • 1 can full-fat coconut milk, refrigerated overnight
  • 1 tablespoon sugar
  • 1 teaspoon vanilla
1. For the crust: Preheat the oven to 350 degrees. Combine the coconut flour, almond meal, shredded coconut, coconut sugar, and salt in a medium bowl. Stir in the melted coconut milk and mix well so that every bit is coated. Dump the crumbs into a 9″ pie plate and press evenly up the sides and bottom of the pan with your fingers. Bake the crust until golden brown, around 20 minutes, and then remove and cool completely.
2. For the filling: Put the passion fruit puree and sugar into a blender and blend until the sugar has dissolved. Add the egg and blend on low until the mixture is smooth and bright orange-yellow. Pour the mixture into a medium saucepan and clean the blender canister. Bloom the gelatin in 2 tablespoons of cold water. Heat the passion fruit mixture over low heat, whisking regularly as it thickens. Once it starts to boil, transfer back to the blender (note: mine never boiled but seemed thick so I continued with the recipe- it turned out fine). Add the bloomed gelatin, coconut oil, and salt, and beat until the mixture is super-smooth. Transfer to a container and chill in the fridge until completely cool.
While it’s cooling, remove the rind of the grapefruit completely, leaving no white pith behind. Then carefully remove each segment of grapefruit from its membrane by slicing down both sides of each segment along the membrane to the center of the fruit; the segments should come right out. In a small saucepan, heat the teaspoon of oil and grapefruit on low heat, stirring occasionally. After about 2 minutes, the warm oil will help separate and encapsulate the individual grapefruit ‘threads’. Remove from heat and let the threads cool slightly before proceeding.
Using a spoon or rubber spatula, gently stir the grapefruit threads into the cooled passion fruit curd. Spread the chilled grapefruit and passion fruit curd evenly over the cooled crust.
3. For the topping: Carefully scoop the solid white fat from the top of the chilled coconut milk can into a small bowl (it’s ok if some of the liquid-y part makes it into the bowl too- this happens to me every time and it still whips beautifully) Add the sugar and vanilla and beat until the coconut fat is fluffy and whipped cream-like.
4. Finish the pie: Spread the whipped coconut cream on top of the grapefruit curd and eat immediately or refrigerate until you’re ready!

Meyer Lemon Meringue Pie (Gluten and Dairy Free)

I got my pie for my money and my money for my pie.
I got 99 problems but a pie ain’t one.
You can find me in the club, pocket full of crust. I got that pie you need if you want your belt to bust.
Ain’t nothing but a pie thang baby! Got that lemon fillin makin me crazy!
It takes pie to make a thing go right. It takes pie to make it out of sight! Preheat it! I wanna bake right now, I’m Arielle and my pies throw down. I’m not internationally known, but I got you with the pies and scones.

Ok, I’ll stop now. Also, I don’t make scones.

All this to say, my crazy generous sister-in-law Joanna (of the Austin Kitchen Gardener fame!) is giving me her gorgeous DSLR camera in exchange for baked goods. I’m going to make her and her gluten and dairy free family one pie for every month this year, each one featuring a local and seasonal ingredient. Pie is my new currency. (Thanks for the pie raps, Jordan and Helen!! You guys are the tops!)

Anyway, this is my January pie! There are some beautiful meyer lemons at the markets now, and this pie makes great use of them.  If you don’t care about eating gluten free you can substitute your favorite crust. The rest of the pie is naturally gluten and dairy free, featuring a bright lemon filling based on Caroline Beck’s genius recipe for olive oil lemon custard. And also, it’s got half the amount of meringue as one of those wacko mile-high meringue pies. Why so much meringue, pie? I want just enough to add a sweet foil to the tart lemon filling, not a big floppy pile of egg white blob that doesn’t fit on my fork.  One other cool thing about this recipe- it borrows the Cooks Illustrated technique of adding a gel made from corn starch to the meringue which allows you to pile the hot meringue on hot filling, and you can eat it right away with no chilling, in case you’re pressed for time or want your remixed meringue pie hot and fresh out’ the kitchen.

Meyer Lemon Meringue Pie
recipe adapted from this, this, and this

  • Gluten and Dairy Free pie dough (see recipe below)
  • Meyer Lemon Filling
    • 3 whole eggs, room temperature
    • 1/2 cup sugar
    • 2 tablespoons Meyer lemon zest
    • 1/2 cup Meyer lemon juice
    • 1/2 teaspoon vanilla extract
    • 1/2 cup extra virgin olive oil
    • 1 cup cold water
    • 1/4 cup cornstarch
  • Meringue Topping
    • 1 tablespoon corn starch
    • 1/3 cup water
    • 4 egg whites
    • 1/2 teaspoon vanilla extract
    • 1/2 cup granulated sugar
  1. Preheat oven to 350 degrees. Fit a homemade or store-bought pie crust into a 9-inch pie plate (I used the recipe copied below); line crust with parchment paper and fill with dried beans or pie weights. Bake until crust is lightly browned, about 35-45 minutes. Carefully lift and remove paper with pie weights and let crust cool.
  2. Make the lemon filling. Place the 3 whole eggs, 1/2 cup sugar, lemon zest, lemon juice, and vanilla extract in a blender and blend until smooth and frothy. Stream in the olive oil with the motor running.
  3. Pour into a double boiler or bowl set over gently simmering water on the stovetop. Whisk together 1 cup cold water and 1/4 cup cornstarch and add to the lemon mixture in the double boiler. 
  4. Stir until the mixture thickens up (it should reach 160 degrees for fully cooked eggs, or hold at 140 degrees for 3 1/2 minutes).
  5. Poor the thickened lemon cream into the cooled crust. (It’s ok if your crust is still a little warm- mine was and everything turned out just fine.) 
  6. Make the meringue. Mix 1 tablespoon of cornstarch with 1/3 cup water in small saucepan; bring to simmer, whisking occasionally at beginning and more frequently as mixture thickens. When mixture starts to simmer and turn translucent, remove from heat. Let cool while beating egg whites. Beat egg whites and vanilla until frothy. Beat in the sugar 1 tablespoon at a time, until sugar is incorporated and mixture forms soft peaks. Add cornstarch mixture, 1 tablespoon at a time; continue to beat to stiff peaks.
  7. Using a rubber spatula, distribute the meringue evenly around edge and then center of the pie. Use a spoon to create peaks all over meringue.
  8. Turn on your broiler to high and adjust your oven rack to the top position. When the broiler is hot, slide the pie onto the rack. Keep the oven door cracked and watch carefully as the meringue browns under the broiler- this happens fast! Turn the pie if needed, to ensure even browning. Remove pie from oven. Let cool to room temperature, and then eat or refrigerate.
Gluten Free and Dairy Free Pie Crust
adapted from the New Best Recipe
  • 1 1/4 cups gluten free all purpose flour, plus more for dusting the work surface (I used cup4cup, but I also like the King ArthurGF flour multi-purpose blend)
  • 1 teaspoon kosher salt
  • 1 tablespoon sugar
  • 3 tablespoons cold vegetable shortening
  • 4 tablespoons (1/2 stick) cold vegan butter (I used earth balance), cut into 1/4 inch pieces
  • 4-5 tablespoons ice water
  1. Mix the flour, salt, and sugar in a medium bowl. Add the shortening and cut in with a pastry knife until the mixture has the texture of coarse sand. Scatter the vegan butter pieces over the flour mixture and cut in with a pastry knife until the mixture is pale yellow and resembles coarse crumbs, with butter bits no larger than small peas.
  2. Sprinkle 4 tablespoons of ice water over the mixture. With a rubber spatula, use a folding motion to mix. Press down on the dough with the broad side of the spatula until the dough sticks together, adding up to 1 tablespoon more ice water if the dough will not come together. Flatten the dough into a disk, wrap in plastic wrap and refrigerate at least 1 hour and up to 2 days before rolling.
  3. Remove the dough from the refrigerator (if refrigerated more than 1 hour, let stand at room temperature until malleable). Place the dough on a lightly floured sheet of parchment paper, dust the top with more GF flour, and top with another sheet of parchment paper. Roll the dough into a 12-inch circle between the sheets of parchment. Transfer the dough to a nine-inch pie plate and crimp the edges.

Baby George!

This is George Arthur Arizpe, my baby boy, and a very fine fellow indeed. George is almost 4 months old now. My days have been filled with trying to work out how to care for two kids, the solution to which, I am happy to share with you, is to forego bathing yourself and said children. Seriously- my sweet Henry received a bath toy for Christmas, and as I was writing the thank you note earlier this week I realized that Henry hadn’t had a chance to play with it because he hadn’t yet taken a bath. So we have some kinks to work out. But back to George! He has the most marvelous half smile- one side of his mouth curling into a grin, offering you a glimpse of his darling little dimple. He adores being held and laughs his head off when his brother smiles at him (something that is happening more often these days).  We are all settling into our new life as a family of four.

As the new year starts, I’ve been itching to blog again. But I didn’t feel like I could jump back in with recipes for meyer lemon meringue pies and meatloaves without first announcing George’s arrival.  I also wanted to write down the story of George’s birth before I’ve forgotten it. Stop reading now if you have no interest in hearing about lady feelings and placenta smoothies. My sister Helen, of Thousand Ships makeup and photography, documented George’s birth for me, so I’m going to use her pictures to tell the story.

Henry was born in a hospital with a midwife. I loved the midwife and nurse, but hated the hospital. I didn’t like the atmosphere, or having to be monitored all the time, or the sitting around after the birth waiting for them to let you go home. I also had a long labor, and thought that it might partly be blamed on leaving the house and driving to the hospital (my contractions stalled out for hours after arriving). I decided that I would want to do a home birth with baby George.

On Monday, September 9, I woke up with the first inklings of contractions. They weren’t terribly regular- ever 20-30 minutes I think, but that went on for a few hours, so I decided to call my mom, who was supposed to fly in the following Saturday to be my doula (I wasn’t due until the 21st). She decided to change her flight and come out that night. I had no idea if it was real labor or not, so I was worried she’d be missing an extra week of work for no reason. After she arrived, the contractions stopped all together. We hung out and ran a ton of errands on Tuesday, and then that night, they started again. Around midnight they were regular enough that I started timing them, marking the start times on my phone for 3 hours, until they got strong enough that I had to get out of bed. Andy sat with me for a bit, and around 4, I woke up my mom and sister and called the midwife.

I really did spend hours in just that spot. Andy and Helen and my mom all took turns standing with me. I rocked from side to side and leaned against the wall and held onto my belly. And I felt like things were happening fairly quickly. Monika, my wonderful midwife (from Heart of Texas Midwives) said that Andy should start filling up the birthing tub (actually a metal stock tank we had bought that spring as a wading pool for Henry), and that she’d be over soon. 

When Monika arrived, she got set up and then checked me. She said “you’re a good 5!”, and I completely lost my shit. I had all but convinced myself that I was fully dilated, that I’d be pushing soon, and that this birth was going to be much shorter and easier than Henry’s. When she said I was a 5, only halfway, all of my deepest fears about this birth dragging on like Henry’s did bubbled up, and I was terribly worried that I wouldn’t be able to handle it again and I’d have to go to the hospital and get an epidural. That’s why I look so miserable in so many of the following pictures.

Monika said I should get into the tub. Oh, but it felt so much better in there! The contractions were still intense, but in the tub they became tolerable, and my back felt so much better. 

When we had talked about the birth with Henry, I told him that he would be able to climb into the tub with me if he wanted. He did! I was still feeling really low at that point, but Henry gave me a hug and said “there’s a George in mama’s vagina” (actually, I think he said “there’s a George in my vagina,” because he mixes up his pronouns) which made me laugh for the first time in hours and really cheered me up. 

My contractions slowed way down when I was in the water.  It was a really lovely break- I even fell asleep for a bit- but I worried that I would never get anywhere if I stayed in the water. So I got out and did more side-to-side rocking a squat-like movements and things started feeling much more intense. Things are sort of hazy from this point on. I lay down in bed and started pushing, but I was still feeling pretty down, partly because my water hadn’t broken yet, so I figured I was still far from giving birth. I remembered reading about the power of self-talk in Ina May Gaskin’s Guide to Childbirth (my favorite pregnancy book by far) and so I said to myself, ‘on the next contraction, I’m going to push so hard that my water is going to break.’ If I was a more gracious person, I’d have said this out loud, because it worked (!) but I managed to splash Monika and Debra (my midwives) and Brandi (the student midwife) in the process.

The midwives asked if I wanted to give birth on the bed or in the tub, because we were getting close (huzzah!). I wasn’t sure (something about labor makes me incapable of making decisions!) but then decided to get back in the tub. 
I pushed some more in the tub- not long, I don’t think, and then I reached down and felt the head- what an amazingly reassuring feeling that was! Just a bit more pushing and the head was coming out. This is what that felt like:

Really really intense. I cried. But it was over quickly!
I was on my hands and knees when George came out. Andy reached in and pulled him out and that unparalleled feeling of relief and happiness washed over me. And George was here!

And just for the zero of you who are interested, here’s a little bit of info about my placenta smoothie:
I had no intention of eating my placenta. Major ick factor. But over the course of my pregnancy, I read more about it, and I slowly but surely became convinced. The benefits are huge- foremost on my mind being that it greatly reduces your chances of postpartum depression, helps your hormones get back in balance, helps your body repair itself, and reduces your postpartum bleeding. It absolutely worked for me, and I couldn’t taste any placenta-ness in the delicious strawberry banana smoothie my brave and beautiful sister made for me (she just tossed a few walnut-sized chunks of raw placenta into a regular old fruit smoothie). I definitely felt like my moods were more balanced this time, and I only bled for six weeks after the birth (I bled for 12 with Henry!). I’d recommend it to anyone who has someone in her life who is willing to cut up your own organs and serve them to you.
And that’s George’s birth story! Thanks for reading it! I’ll be back soon with actual food blog material. 

George Arthur Arizpe, 7 pounds 6 ounces, born September 11, 2013 at 12:49 PM
Huge thanks to my sister Helen for documenting the birth for me! Please visit her website, Thousand Ships makeup and photography, if you’re interested in having beautiful pictures of your loved ones or of a special moment in your life.